How to Draw a Bunny
How to Draw a Rabbit (Bunny)
Drawing rabbits can be a fun and rewarding experience! Below is a detailed guide, broken down into easy steps:
Table of Contents
How to Draw a Rabbit (Bunny) 1
Method 1: Simple Cartoon Bunny (Ideal for Beginners) 1
1. Draw the basic shapes of the body and head: 1
2. Add guidelines for the facial features: 1
4. Sketch the facial features: 1
Method 2: A More Realistic Rabbit 2
3. Refine the shape of the head: 3
5. Draw a diagram of the body and organs: 3
6. Add detailed facial features: 3
7. Enhance the Body and Organs: 3
10. Finishing Touches and Cleanup: 4
Method 1: Simple Cartoon Bunny (Ideal for Beginners)
Follow the red lines
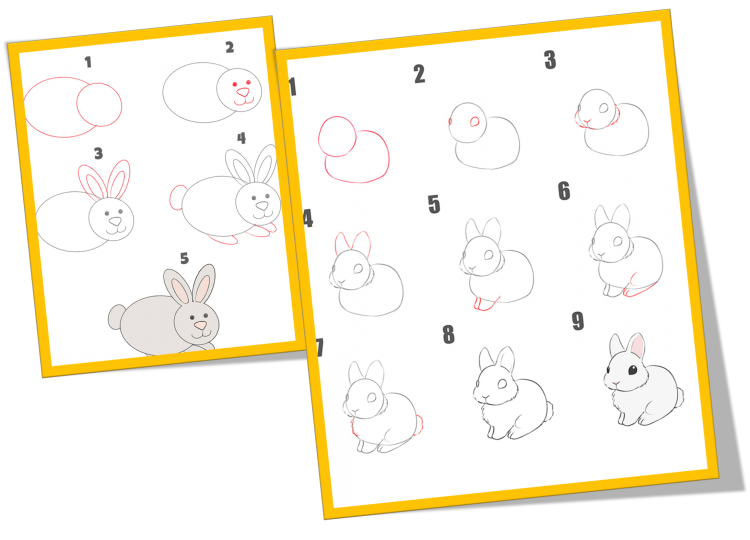
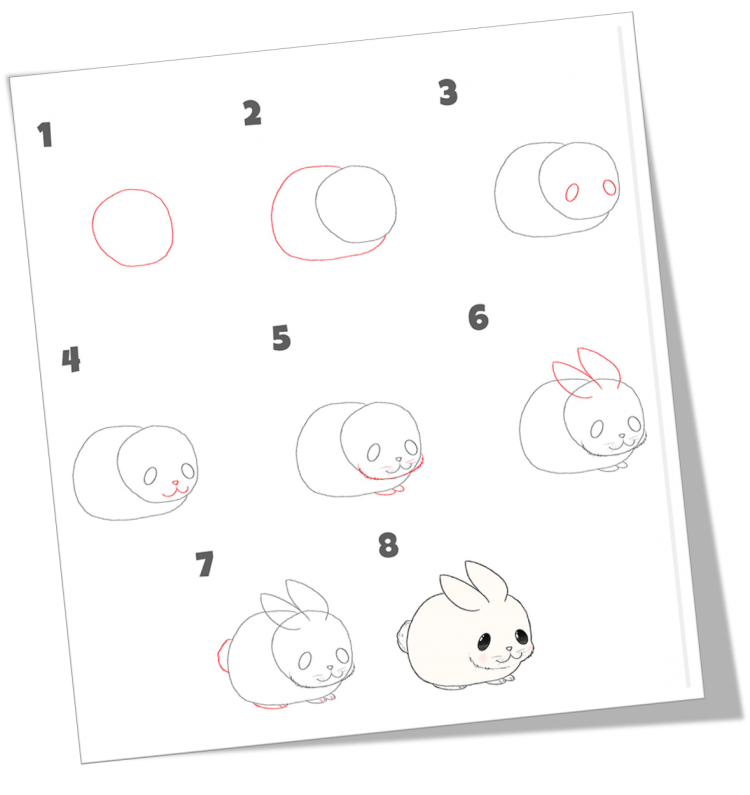
1. Draw the basic shapes of the body and head:
- Body: Start with a slightly elongated oval shape for the rabbit's body. It should be wider at the bottom and slightly narrower at the top.
- Head: Draw a small circle or oval for the head, above and slightly overlapping the body. Its width should be equal to the narrowest part of the body. Think about overall proportions: the head is usually smaller than the body.
2. Add guidelines for the facial features:
- Lightly draw a vertical line down the centre of the head circle. This will help keep the eyes and nose in sync.
- Draw a horizontal line down the middle of the head circle. This will be a common area for the eyes.
3. Draw the ears:
- Bunny ears are a distinctive feature! Draw two long, curved shapes extending upward from the top of the head. They can be straight or slightly floppy.
- At first, make them roughly the same size and shape. You can adjust them to give them more character later.
- Consider the desired posture: upright for alert, slightly back for relaxed, slack for playful.
4. Sketch the facial features:
- Eyes: On the horizontal guideline, draw two small ovals or circles for the eyes, one on each side of the vertical guideline. Leave some space between them.
- Nose: Draw a small rounded triangle or heart shape for the nose, below the horizontal guideline and centered on the vertical guideline.
- Mouth: Below the nose, draw a small inverted "Y" shape or a slight curve to suggest a mouth. To create the upper lip, you can add two small curved lines extending downward from the bottom of the vertical line.
5. Add the front legs:
- Below the head and toward the front of the oval body section, draw two short, slightly curved lines for the front legs. They should be relatively small and end with small, rounded claws. You can show them standing upright or slightly tilted.
6. Stretch the hind legs:
- Toward the back of the oval body section, draw two larger, curved shapes for the hind legs. A rabbit's hind legs are usually bent, ready to jump.
- Make the thighs thick and the lower legs turned downward. Add slightly larger, rounded claws for the hind legs.
7. Add the tail:
- On the back of the oval body, draw a small fluffy circle or pom-pom shape for the rabbit's tail.
8. Improve the outline:
- Look at your initial sketch with a darker line, refine the shapes, and make the rabbit's form more defined.
- Soften any harsh edges and adjust the curves of the body, head, and limbs.
- Consider the overall flow and make sure the different parts of the rabbit connect naturally.
9. Add details:
- Inner ear: Draw a small curved line inside each ear to add depth. You can give this area a light tone later.
- Eye details: Add small dots or ovals inside the eyes for the pupils. You can also add something special to make them more lively.
- Nose details: Add a small vertical line down the center of the nose.
- Paw details: You can add small lines to suggest the toes.
- Whiskers: Add a few delicate, curved lines extending from the sides of the nose.
10. Erase guidelines:
- Carefully erase all initial guidelines and any overlapping lines that are no longer needed.
11. Colouring (optional):
- If you want to colour your rabbit, you can use crayons, colored pencils, markers, or paints. Common rabbit colours include white, brown, gray, and black, or a combination. You can also get creative with fancy colours!
- Consider adding shading to give your rabbit more dimension.
Method 2: A More Realistic Rabbit
Some easy wat to draw bunny (Rabbit)
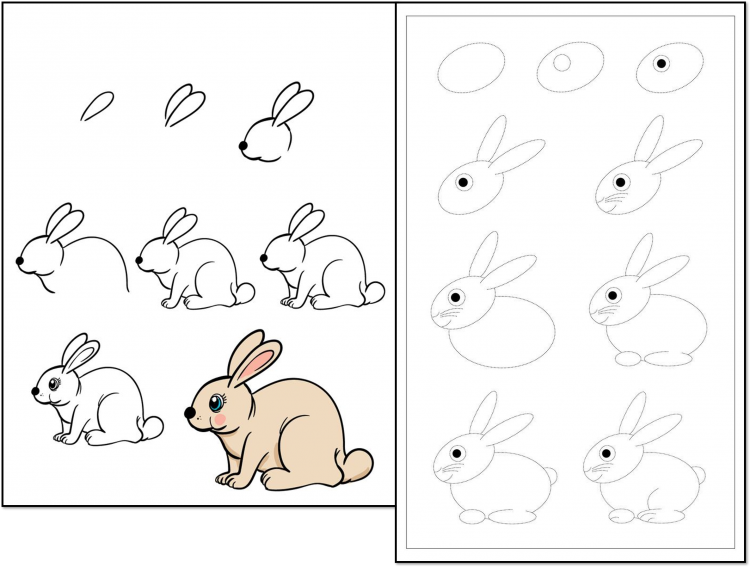
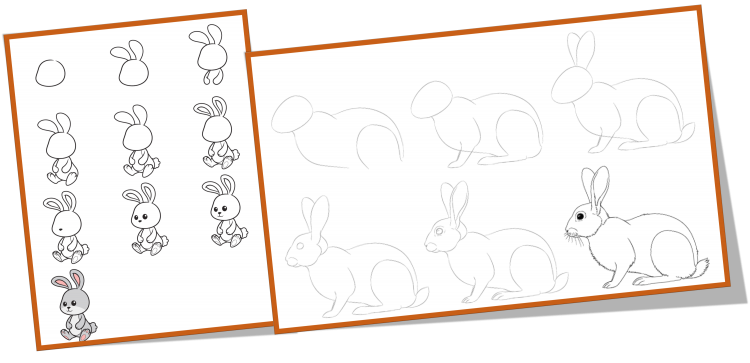
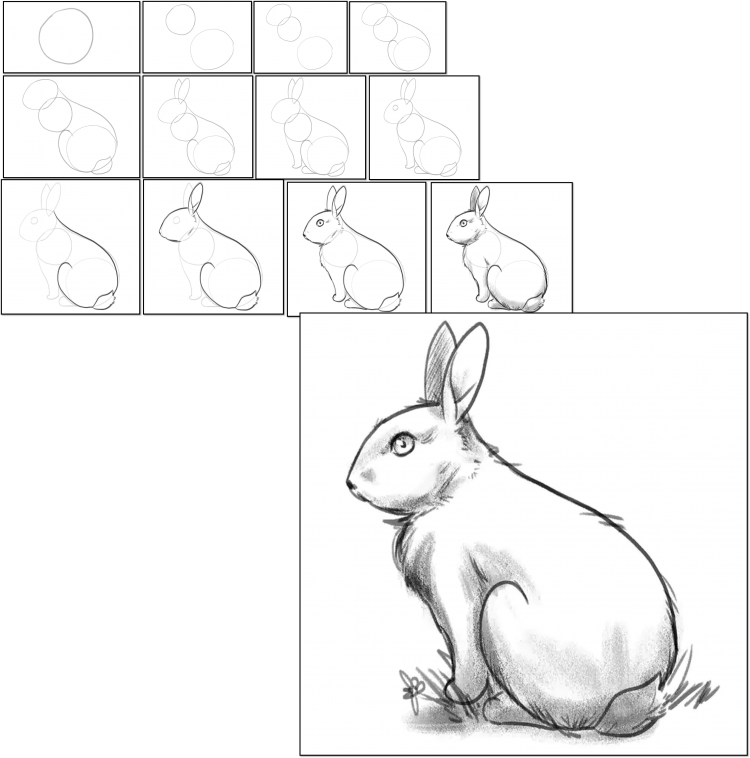
1. Gesture Drawing:
- Start with a few quick, loose lines to capture the rabbit's overall pose and movement. Think about its posture: is it sitting, hopping, or lying down?
2. Establish Basic Shapes:
- Use ovals and circles to describe important body parts:
- A large, rounded oval for the torso.
- A small, slightly pear-shaped oval for the head, sticking out to indicate the rabbit's direction.
- Lightly outline the general location and length of the ears.
3. Refine the shape of the head:
- Soften the oval of the head, paying attention to the subtle curves of the cheeks, forehead, and mouth.
- Lightly outline the eye sockets and the nose and mouth area.
4. Draw the ears in detail:
- Note the shape of real rabbit ears: they are usually wide at the base and taper toward rounded tips. They may have a gentle curve or a more pronounced bend.
- Draw the structure of the inner ear, which is usually slightly lighter in color and has more complex folds and curves.
5. Draw a diagram of the body and organs:
- Refine the shape of the torso by observing the rabbit's posture.
- Lightly outline the placement and proportions of the legs. Remember that a rabbit's hind legs are powerful and often bent, while the front legs are shorter and straighter when sitting. o Think about basic anatomy, even if you're not stretching every muscle.
6. Add detailed facial features:
- Eyes: Draw almond-shaped eyes, paying attention to their placement and gaze direction. Add pupils and highlights for realism.
- Nose: Draw the rabbit's nose, which is usually round or slightly heart-shaped with visible nostrils. Add subtle shading to give it shape.
- Mouth and Whiskers: Lightly outline the mouth area and add delicate, individual whiskers extending from the mouth. Note the direction and length of the real rabbit's whiskers.
7. Enhance the Body and Organs:
- Soften the outline of the legs and feet.
- Show the subtle curves of the rabbit's body, indicating muscles and fur.
- Draw paws with individual toes (usually four in front and four in back, although sometimes they are shown with three or four prominent toes).
8. Add the Tail:
- Draw a characteristic fluffy, cottony tail. Use short, overlapping strokes to suggest the texture of the fur.
- 9. Texture and Fall of the Fur:
- This is very important for a realistic rabbit. To create texture, use light strokes in the direction the fur grows.
- Observe how light and shadows fall on the rabbit's body and use shading to create depth and volume. Areas that are farther from the light source will be darker.
- Pay attention to subtle variations in the color and tone of the fur.
10. Finishing Touches and Cleanup:
- Erase any remaining guidelines.
- Or darken the main outline where necessary.
- Add any final details, such as subtle wrinkles around the eyes or variations in the length of the fur.
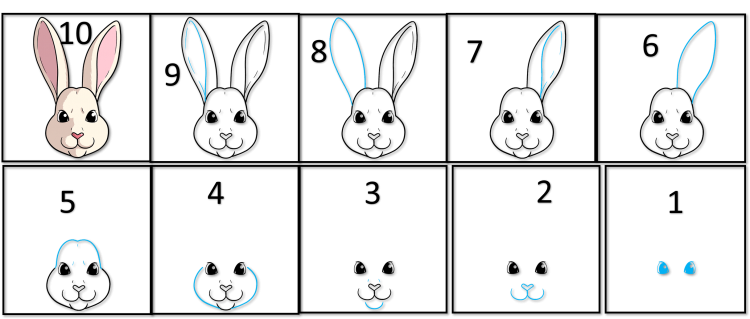
Draw Bunnay Face:
Tips for Drawing Rabbits:
- Observe real rabbits: If possible, study real rabbits or good photographs. Pay attention to their anatomy, proportions, and how they move.
- Start gently: Use soft pencil strokes for initial sketches so you can easily erase and adjust.
- Focus on basic shapes first: Building your drawing with simple shapes helps establish the overall look before adding details.
- Pay attention to proportions: Notice the relationship between the size of the head, body, ears, and legs.
- Practice different poses: Try sitting, jumping, eating, and lying down to improve your understanding of rabbit anatomy and movement.
- Don't be afraid to use references: Looking at drawings made by other artists provides inspiration and helps you understand different techniques.
- Practice regularly: The more you draw, the better you'll get!
Have fun drawing your rabbit! Don't worry if your first attempt isn't perfect. Keep practicing, and you'll see improvement over time.