Flower: How to Draw a Rose
Flower: How to Draw a Rose
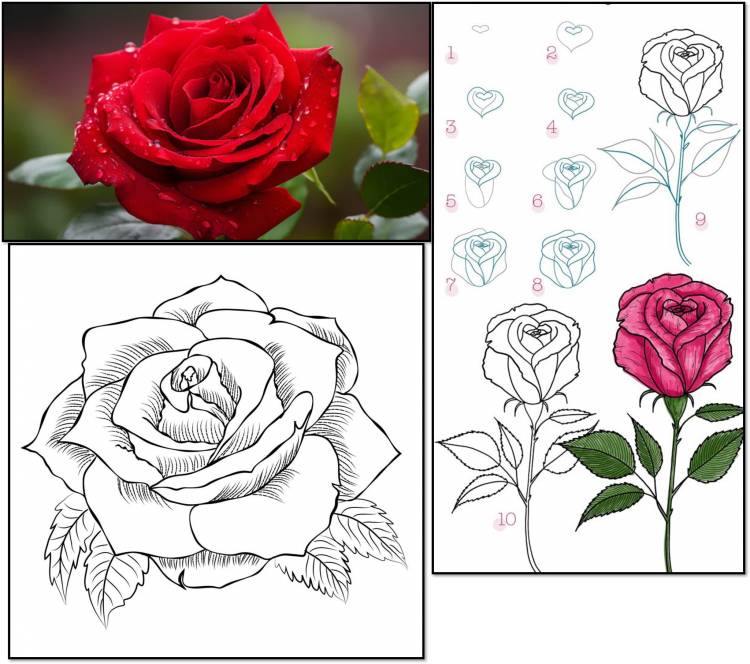
Drawing a rose may seem complicated, but by breaking it down into simple steps and focusing on the basic shapes, you can create a beautiful rendering. Here's a detailed guide:
Leaf & ray florets of Rose
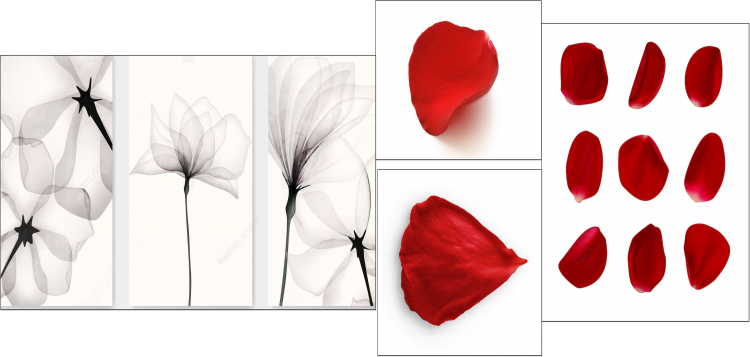
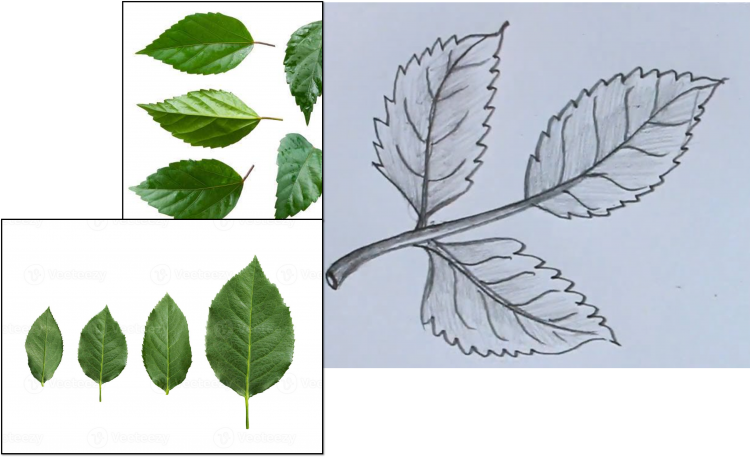
Table of Contents
Method 1: Simple Open Rose (Good for Beginners) 1
1. Create a central bud shape: 1
2. Add the first layer of petals: 1
3. Continue adding layers of petals: 1
5. Make the Sepals (optional but recommended): 1
7. Add Directions (optional): 1
10. Shading (optional but adds depth): 2
1. Create a narrow cone or oval shape: 2
2. Add the protective outer petals: 2
5. Add Directions (optional): 3
6. Refine the outline and add details: 3
Method 3: Open Spiral Rose (A More Structured Approach) 3
1. Create a small central circle: 3
2. Draw a spiral around the center: 3
3. Forming Inner Petals with Spirals: 3
4. Add Large Petals Around the Inner Part: 3
5. Draw the outermost petals: 3
9. Erase the guidelines (including the whorls). 4
10. Shading and coloring (optional). 4
Tips for making rose flowers: 4
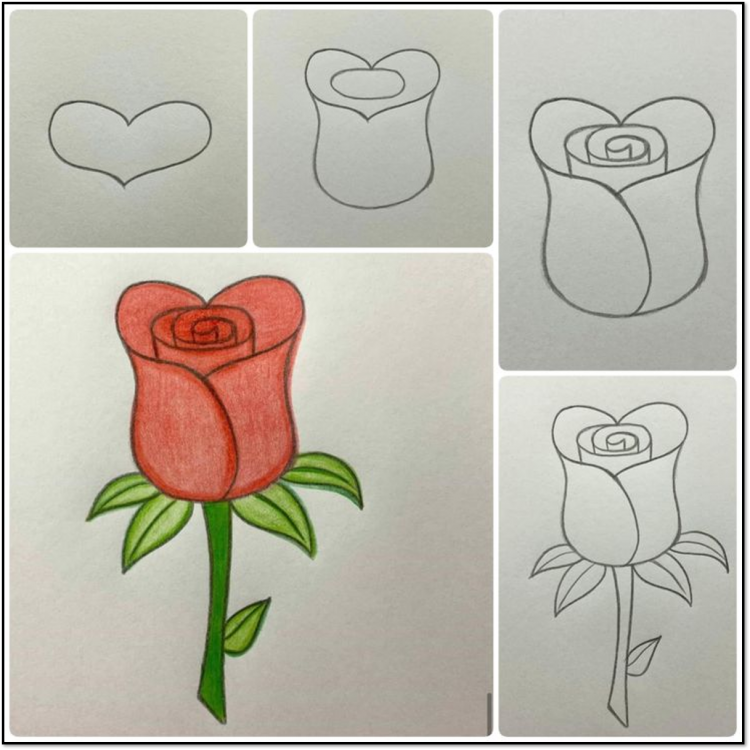
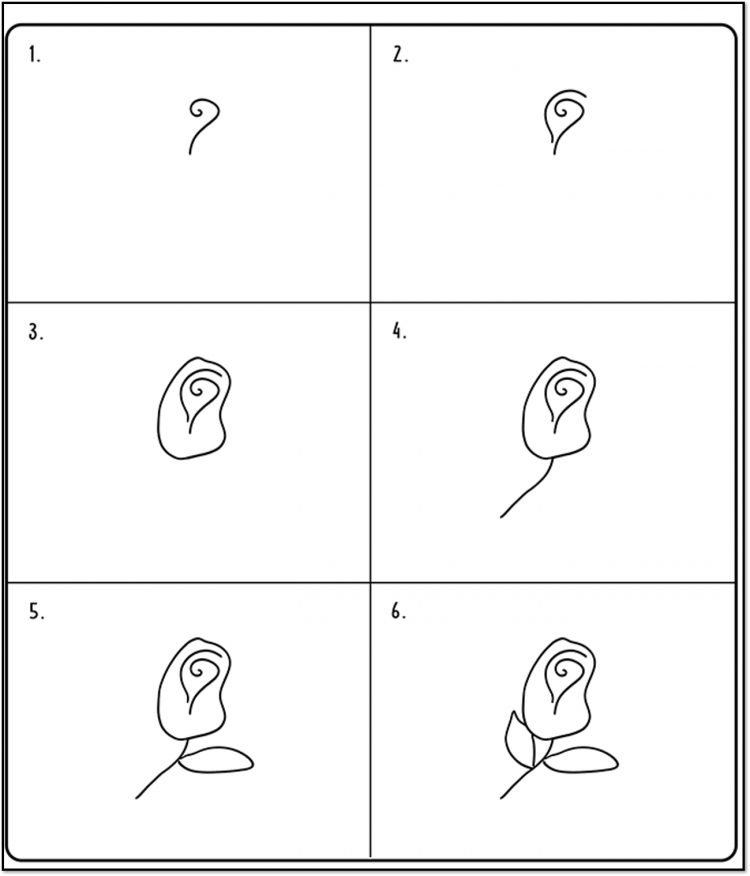
Method 1: Simple Open Rose (Good for Beginners)

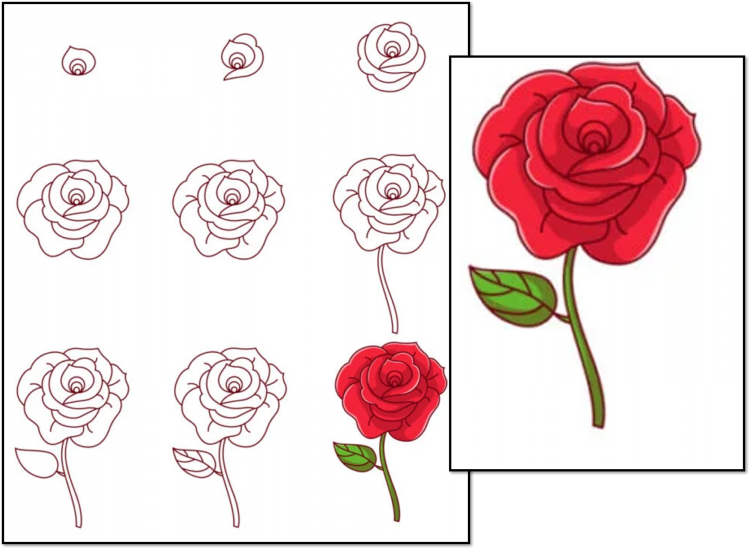
1. Create a central bud shape:
- Start with a small, slightly elongated teardrop or cone-shaped shape. This will be the tightly coiled center of the rose.
2. Add the first layer of petals:
- Around the base of the central bud, draw a few (usually 3 to 5) overlapping curved shapes that resemble small hearts or rounded triangles. These petals should gently curve outward and slightly embrace the central bud. Think of them as hollowing out the center.
3. Continue adding layers of petals:
- Now, draw another layer of petals that are slightly larger and more open than the first. These petals should emerge from behind the first layer and curve outward more dramatically. Let them overlap naturally. Don't aim for perfect harmony; organic shapes are the key to a realistic rose.
4. Extend the Outer Petals:
- For the outermost layer, draw even larger petals that are more relaxed and may have slightly ruffled or curled edges. These petals will give the rose its full, open appearance. Some of these outer petals may be slightly drooping.
5. Make the Sepals (optional but recommended):
- At the base of the flower, draw a few (usually 5) leaf-like structures called sepals. These are usually pointed and curve downward, allowing them to support the flower.
6. Add the Stem:
- Extend two slightly curved lines downward from the base of the flower to create the stem. You can make it as long or short as you like.
7. Add Directions (optional):
- Roses have compound leaves, meaning several leaves grow from a single stem. Remove a few stems that branch off the main stem.
- On each of these small stems, draw 3 to 5 (or sometimes more) oval or slightly pointed leaves with jagged (sawtooth) edges.
8. Refine the Outline:
- Look over your initial sketch with a darker line, refining the shapes of the petals, sepals, stem, and leaves.
- Soften any harsh edges and adjust the curves to make them look more natural.
9. Erasing Guidelines:
- Carefully erase all initial guidelines and any overlapping lines that are no longer needed.
10. Shading (optional but adds depth):
- Note where the light source is coming from and add shading to create dimension:
- Petals: Use curved lines following the shape of the petals to indicate layers and shadows. The areas where the petals overlap are usually darker. The interior of the rose will also be darker.
- Sepals and leaves: Add shading along the veins and edges to give them shape.
- You can use hatching (parallel lines), cross-hatching (intersecting lines), or soft blending for shading.
11. Coloring (optional):
- If you want to color your rose, you can use different media such as colored pencils, markers, or paints. Common rose colors include red, pink, white, yellow, and orange.
- Consider using light and dark shades of your chosen color to enhance the three-dimensional effect.
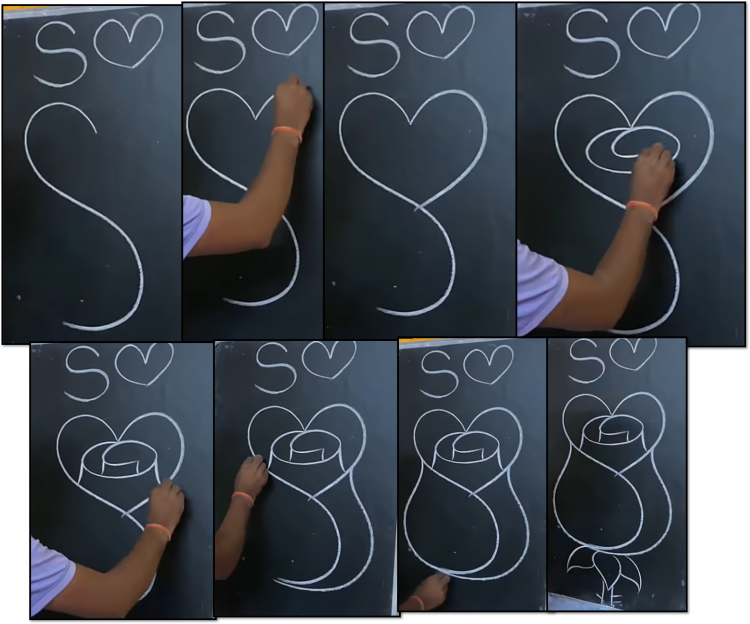
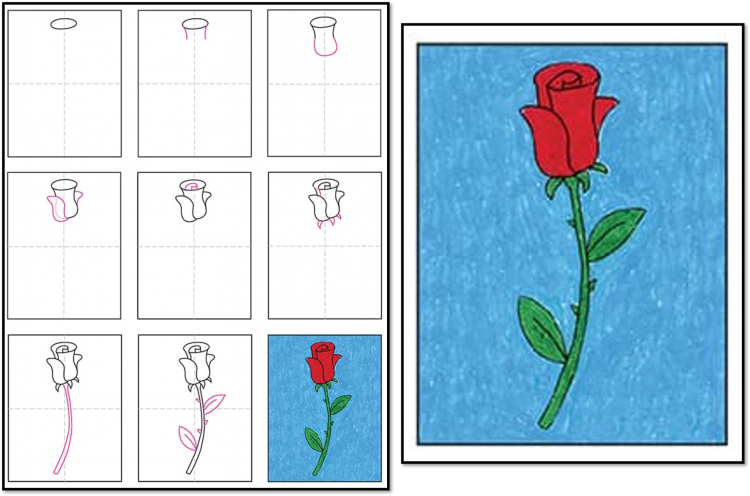
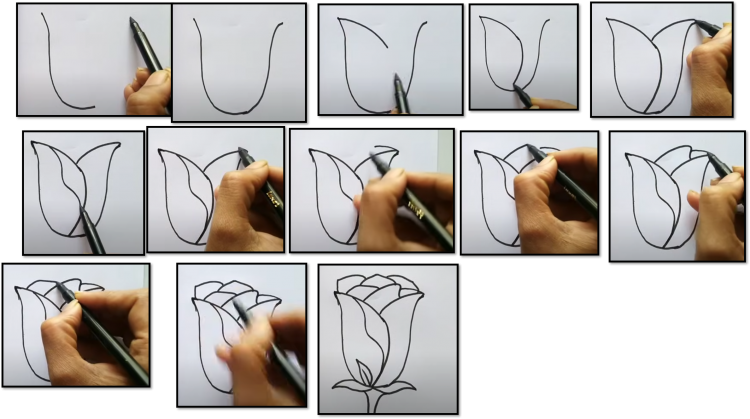
Method 2: Rosebud (Closer)
More easy Method
another method
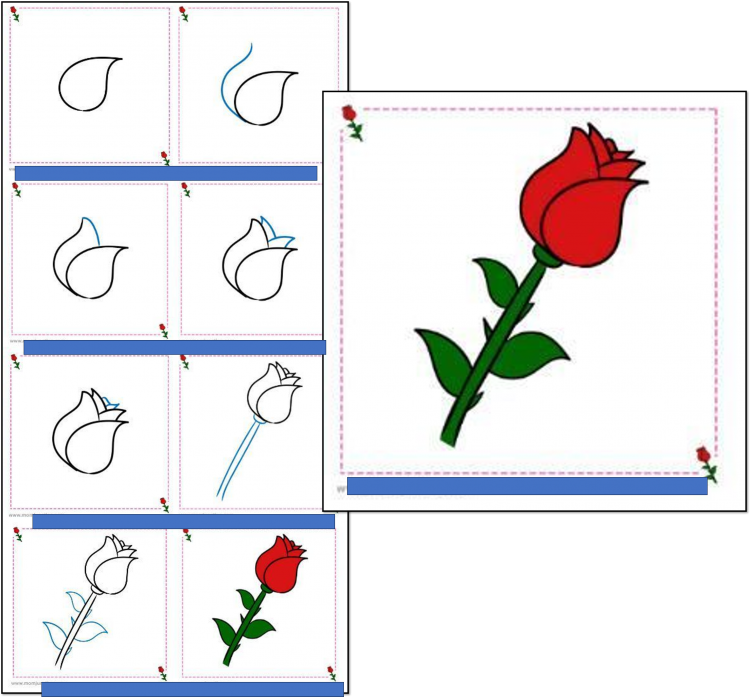
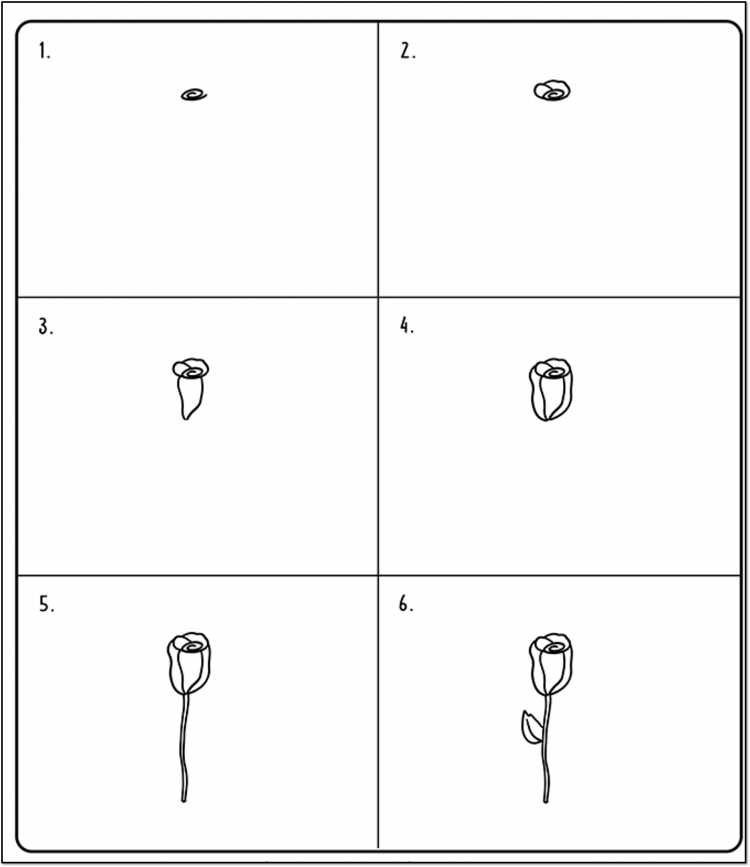
1. Create a narrow cone or oval shape:
- Start with a thin, slightly elongated cone or oval shape. This represents the tightly closed petals of a bud.
2. Add the protective outer petals:
- Around the bottom of the cone, draw a few (usually 2 or 3) larger, curved petals enveloping the buds. They may have slightly pointed tips and overlap each other. They act as protective outer layers.
3. Draw the sepals:
- At the base of the bud, draw several (usually 5) pointed sepals that curve downward and slightly outward, balancing the bud.
4. Add the stem:
- Extend two slightly curved lines downward from the base of the sepal to form the stem.
5. Add Directions (optional):
- Similar to the open rose method, add compound leaves branching from the stem.
6. Refine the outline and add details:
- Darken the main lines and soften the shapes.
- Add subtle curves and folds to the outer petals to suggest layers within the bud.
7. Erase the guidelines.
8. Shading (optional):
- Shade the areas where the petals are wrapped and the inner parts of the bud to create depth. There may be dark shadows on the protective outer petals.
· 9. Color (optional).
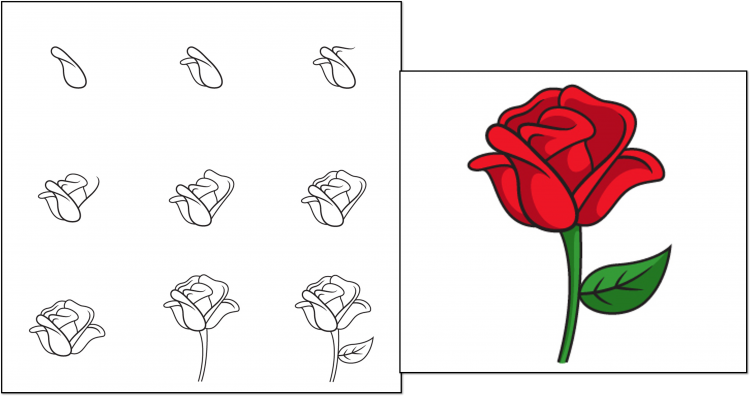
Method 3: Open Spiral Rose (A More Structured Approach)
This method focuses on the spiral arrangement of petals.
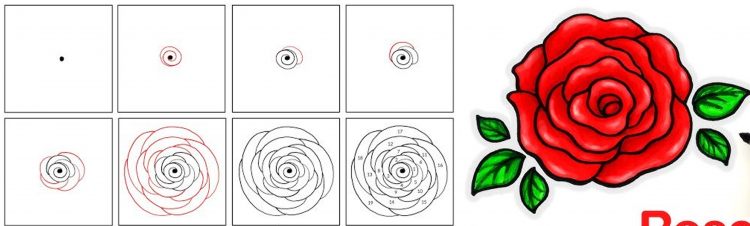
1. Create a small central circle:
- Represents the very center of the rose.
2. Draw a spiral around the center:
- Starting at a point near the edge of the central circle, draw a loose, curved spiral extending outward. This spiral will determine the placement of the inner petals.
3. Forming Inner Petals with Spirals:
- Following the spiral line, draw small, curved petals that curl inward toward the center. Think of them as tightly wrapped ribbons.
4. Add Large Petals Around the Inner Part:
- Begin drawing larger, open petals emerging from behind the inner petals. They should still have a curved shape and overlap naturally. Continue extending each layer of petals outward.
5. Draw the outermost petals:
- These will be the largest and most open petals. They may have slightly ruffled or folded edges, and this will give the rose its overall shape and size.
6. Add sepals to the base.
7. Add the stem and leaves.
8. Refine the outline.
9. Erase the guidelines (including the whorls).
10. Shading and coloring (optional).
Tips for making rose flowers:
- Observe real roses: Study the shapes, curves, and overlapping patterns of real rose petals at different stages of bloom.
- Start gently: Use soft pencil strokes for initial sketches.
- Focus on overlap: Rose petals naturally overlap, creating depth and complexity. Pay attention to which petals are in front and which are in back.
- Vary the sizes and shapes of the petals: Don't make all the petals the same. Natural variations add realism.
- Accept imperfections: Real roses aren't perfectly symmetrical. Allow for small irregularities in your drawing.
- Practice different angles: Try drawing roses from the side, from above, and at different stages of bloom.
- Pay attention to light and shadow: shading is crucial to making your rose three-dimensional.
- Don't be afraid to use references: Look at photos of roses to guide your drawing.
By following these steps and practicing regularly, you'll be able to create beautiful, detailed roses. Choose the method that feels most comfortable to you and enjoy the process!
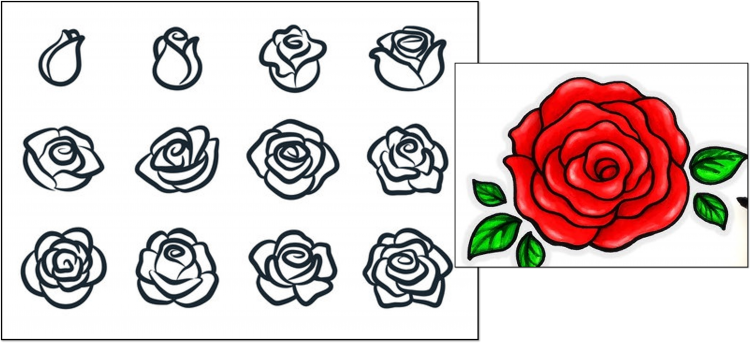
Some More Sketch

One more easyest method